Wooden Raised Garden Bed Box: Setup, Planting & Care
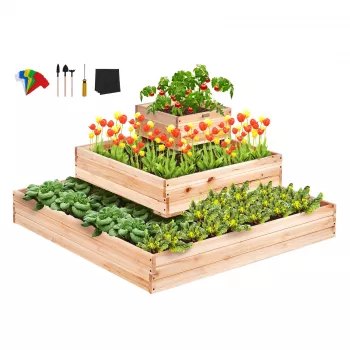
Wooden Raised Garden Bed Planter Box for Flowers, Herbs & Vegetables: Setup, Planting, and Care
A wooden raised garden bed planter box creates a tidy, productive growing space for flowers, herbs, and vegetables while improving drainage and reducing soil compaction. With the right placement, soil blend, and planting plan, it can support season-long color and harvests in patios, yards, and compact gardens.
If you’re ready to build a cleaner-looking growing zone fast, the Wooden Raised Garden Bed Planter Box for Flowers, Herbs & Vegetables offers a simple way to define planting space, keep soil contained, and make daily garden care feel more organized.
Why a Wooden Raised Bed Works So Well
- Better drainage than many in-ground spots, helping roots avoid soggy soil after rain or watering.
- Warmer soil earlier in the season, which can speed germination for many crops.
- Improved soil structure because the growing area isn’t repeatedly stepped on and compacted.
- Clear borders that help keep mulch, compost, and irrigation where they belong.
- More comfortable tending and harvesting with less bending and kneeling, especially when placed near walkways.
Healthier soil structure is more than a convenience—it supports water movement, root growth, and beneficial organisms. For a deeper background on what “healthy soil” really means, see USDA NRCS Soil Health.
Placement and Light Planning
- Choose a level location; a slight slope can be corrected with shims, pavers, or a leveled base so soil doesn’t migrate.
- Aim for 6–8 hours of sun for most vegetables; herbs vary (basil and rosemary prefer more sun, mint tolerates part shade).
- Keep the bed close to a water source to make consistent watering easier during heat.
- Allow access on at least two sides so planting, thinning, and harvesting don’t require stepping into the bed.
- Avoid placing directly under heavy tree canopy where roots compete for water and falling leaves can smother seedlings.
Sunlight needs at a glance
| Plant type | Ideal daily light | Notes for raised beds |
|---|---|---|
| Leafy greens (lettuce, spinach) | 4–6 hours | Benefits from afternoon shade in hot climates |
| Fruiting vegetables (tomato, pepper) | 6–8+ hours | Stake/cage early to avoid root disturbance later |
| Root crops (carrot, beet) | 6+ hours | Loose, stone-free soil improves shape and yield |
| Mediterranean herbs (rosemary, thyme) | 6–8 hours | Prefer sharper drainage; avoid overwatering |
| Flowering annuals (marigold, zinnia) | 6+ hours | Good for pollinators and edging |
For additional raised-bed placement and setup guidance, the University of Minnesota Extension’s raised bed gardening resource is a helpful reference.
Soil Mix That Supports Flowers, Herbs, and Vegetables
- Use a blend designed for both drainage and fertility: a common starting point is roughly 40% topsoil, 40% compost, 20% aeration material (aged bark fines or perlite).
- Add a slow-release organic fertilizer or balanced granular feed at planting time; follow label rates to avoid salt buildup.
- Mix in additional compost each season (1–2 inches on top) to replenish nutrients and support beneficial microbes.
- Check pH if plants struggle; many vegetables prefer slightly acidic to neutral soil (about 6.0–7.0).
- Mulch the surface (straw, shredded leaves, or bark) to reduce evaporation and keep soil temperature steadier.
Homemade compost can stretch your garden budget while improving tilth and moisture-holding capacity. If you’re starting from scratch, the EPA guide to composting at home offers clear, practical steps.
Planting Layout Ideas for a Single Bed
- Create zones: taller crops toward the north side (in the Northern Hemisphere) to reduce shading shorter plants.
- Mix ornamentals and edibles: marigolds, nasturtiums, and calendula add color and can help attract pollinators.
- Use succession planting: replace early spring greens with warm-season herbs or flowers once temperatures rise.
- Reserve corners for perennial or spreading herbs (chives, oregano) in contained sections to reduce take-over.
- Plan for airflow: avoid over-crowding to reduce powdery mildew and other moisture-related issues.
A simple layout that looks polished is “tall-back, low-front”: tomatoes or peppers at the back with basil and thyme mid-bed, then marigolds or compact zinnias along the edge. If you want a small decorative accent near the bed without adding plant competition, a weather-protected piece like the Nordic Girl Diver Reading Figurine can finish the space in a subtle, garden-friendly way.
Watering and Drainage Basics
For gardens that rely on outdoor power setups—charging a phone for a timer, running a small pump at a rain barrel, or keeping a portable power station topped off—having a flexible panel on hand can make routine maintenance easier. The 100W Foldable Solar Panel for Portable Power Stations is a convenient add-on for backyard projects where outlets aren’t close.
Protecting the Wood and Extending Bed Life
Seasonal Care and Simple Crop Rotation
Common Problems and Practical Fixes
FAQ
How deep should a raised bed be for vegetables and herbs?
Many vegetables do well with 8–12 inches of soil, while deeper beds are especially helpful for root crops and long-season plants. Prioritize a loose, well-draining mix so roots can expand and moisture stays more consistent.
What should go in the bottom of a wooden raised bed?
If the bed sits on soil, leave the bottom open and add hardware cloth underneath if burrowing pests are an issue. If it’s placed on a hard surface, make sure water can drain freely and use a breathable layer that won’t trap moisture.
How often should a raised bed be watered?
Water when the top 1–2 inches of soil feel dry; in hot or windy weather that can mean daily checks, while cooler periods may need less. Aim for deep watering that soaks the root zone instead of frequent light sprays.










Leave a comment